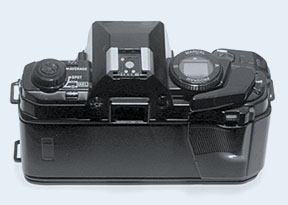
Metering the light part II
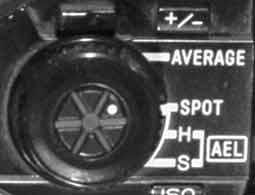
As noted in the "Metering the light" section, there are special spot meter settings named "H" (Highlight) and "S" (Shadow). They are intended for use in special situations, when normal midtone spot readings aren't adequate.
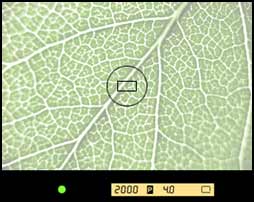
Normal spot metering
The normal spot metering system looks at the center part of the picture and tries to balance the exposure for that point so that it is rendered as middle gray on the film. In my experience, this tone corresponds to (roughly) sunburnt caucasian skin, but your mileage may vary. This is often referenced to as "18% gray", or "Zone 5" if using the zone system. Read an interesting article by Thom Hogan for a perspective on the 18% number.
Highlight readings (H setting)
Highlight readings should be used when the most important or largest part of the photo is white or very light-colored. If a center-weighted reading (or spot midtone reading) is used, these areas will appear too dark, underexposed. When highlight readings are made, exposure is increased with 2 1/4 stops so that the lighter areas will be properly exposed.
- Set the metering selector to the "H" position.
- Position the camera so that a light area fills the spot-metering circle in the viewfinder.
- P, A or S mode: Press and hold the AEL button. Shutter/aperture settings for correct exposure of the light area will now be displayed. While still pressing the AEL button, recompose the photo, and release the shutter.
M mode: While the pressing AEL button, adjust shutter speed and aperture for "-0" or "+0" exposure deviation. Recompose the photo and release the shutter.
Shadow readings (S setting)
Shadow readings should be used when the most important or largest part of the photo consists of mostly darker tones. If a center-weighted reading (or spot midtone reading) is used, these areas will appear too light, overexposed. When shadow readings are made, exposure is decreased with 2 3/4 stops to properly expose these areas.
- Set the metering selector to the "S" position.
- Position the camera so that a dark area fills the spot-metering circle in the viewfinder.
- P, A or S mode: Press and hold the AEL button. Shutter/aperture settings for correct exposure of the shadow area will now be displayed. While still pressing the AEL button, recompose the photo, and release the shutter.
M mode: While pressing the AEL button, adjust shutter speed and aperture for "-0" or "+0" exposure deviation. Recompose the photo and release the shutter.
- If the AEL button is not pressed, the meter will act as a normal spot meter. This will probably produce strangely exposed pictures, as it is fairly uncommon with a middle gray item in the exact center of the picture.
- These modes can be a little hard to grasp. Think of them as "still some detail" modes; if you spot meter a dark part with the "S" setting, that part will be "not-quite-black", it will still have some slight structure and definition. Likewise, the "H" mode should represent "not-quite-burnt-out"; it can probably be used for getting feather detail from a white duck, for example (not tested).